


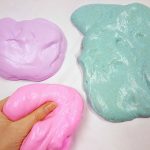
Get ready for colorful, sparkly fun! Making slime is easier than ever with our Slime Easy Pack. All you need are two ingredients to make the slime – glue and a liquid slime activator. No need to buy contact solution or baking soda! Then add glitter and liquid watercolor included in the kit to make the slime colorful, glittery, and a creation of your own.
This pack includes everything needed to create at least 24 batches of glittery slime. Best of all, this slime recipe is safe, washable, and non-toxic.

Our Slime Easy Pack Contains:
- Color Splash! Clear Glue – 1 gallon (128 oz)
- Elmer’s Magical Liquid – 32 oz
- Color Splash! Liquid Watercolors – 6 colors, 1 oz
- Color Splash! Glitter – 6 colors, 3/4 oz
- 24 Storage Containers with lids
- How-To Guide
Just add a ½ cup measuring cup and stir sticks.
Slime Kit Instructions
Video Instructions:
Step By Step Instructions:
Please read through all steps prior to starting slime making. View the printable instructions here >
Step 1: Gather Your Ingredients – Assemble all the materials needed for your slime making adventure. Cover work surface to protect against spills.
Step 2: Let The Fun Begin! – Start by pouring 4-oz of clear glue into one storage container for each slime maker.

Step 3: Add Glitter for Sparkle (if desired) – Sprinkle your chosen glitter colors into the container with the glue. The more glitter you add, the more sparkle your slime will have…but start out small as a little can go a long way. Mix the glitter and clear glue thoroughly for an even distribution.
Step 4: Tint Your Slime with Liquid Watercolors (if desired) – Keep your slime clear or select your favorite liquid watercolor to give your slime cool transparent color. Add a drop of liquid watercolor to the clear glue and glitter mixture. Again, as with the glitter, add sparingly as this color is very concentrated and you don’t need much to achieve beautiful colors. Stir until the color is evenly distributed and you achieve the desired hue. We added just one drop of purple and it produced a nice vibrant color.

Step 5: Add the Elmer’s Magical Liquid – This is where the magic happens! Pour Elmer’s Magical Liquid into the mixture starting with a couple of teaspoons while stirring continuously. Keep stirring until the slime begins to thicken and form. If your slime seems too “sticky”, add more Magical Liquid, a teaspoon at a time as needed, until you reach your desired slime consistency. We added 3 teaspoons to ours.

Step 6: Knead and Play! – Once your slime has formed, take it out of the container and knead it with your hands. The more you knead, the smoother and stretchier your slime will become. Enjoy the sensory experience of playing with your colorful, glittery slime. It will feel cool and almost “wet” to the touch but your hands will dry quickly.
TIP: It will feel sticky and stick to your hands, but once you knead it enough, it will be more of a slime consistency. It takes some time!


Step 7: Store in the Slime Container – After playing, store your slime in the airtight container to keep it fresh for future fun. Make sure to secure the lid tightly to prevent drying. If properly stored, the slime will last for weeks!

Always wash your hands before and after playing with slime.
Additional Slime Tips

Experiment with different glitter combinations and liquid watercolor shades to create unique slime variations. Tint two batches of slime using different colors and then combine them
for fun swirly slime!
Experiment and get creative with your slime – use white glue or glitter glue (in the same proportions as the recipe above) for different effects. Try adding sequins, small glass beads and other mix-ins for fun textured slime.
Optional Supplies for Slime Variations:
- Color Splash! Glitter Glue – try this for ultra-glittery slime!
- Color Splash! White Glue – make interesting opaque slime that can also be tinted with the Liquid Watercolors and sparkled with glitter
- Sequins or other add-ins to add to the tactile experience!

All supplies are available separately to “refill” your pack. View the list here >
NOTE: Adult assistance/supervision is recommended when using liquid watercolors as the concentrated color may stain clothing and surfaces.
View our other Slime recipe here >


Pingback: How to Make Slime - A Safer Recipe for Kids - S&S Blog