


Grow your own garden with our EduCraft® Zinnia Flower Gardens Pack! The best time to plant zinnias is late April, when there is no more frost and the temperature is over 50 degrees. You can plan them into the beginning of July. One of the easiest flowers to grow, seeds start in the included pots and then can be transplanted into a garden or kept on a sunny windowsill to bloom. Everyone can decorate and customize the reusable pot with the included sticker designs. Our pack of 48 comes with all supplies and instructions included.
Age group: 5 and up
Project time: 45 minutes
Your kit contains:
- Plastic Pots
- Zinnia Seeds
- Colored Pencils
- Soil Pellets
- Printed sticker sheets
You will need:
- Scissors
- Spoons
- Plastic Wrap
- Rubber Bands
- Water
- Large Pan or Pail
Each person should have a plastic pot. The zinnia seeds, colored pencils, and sticker sheets (see note) will be shared among the group. The soil pellets, once hydrated will be shared among the group.
Video
Instructions
Design the Flower Pot:
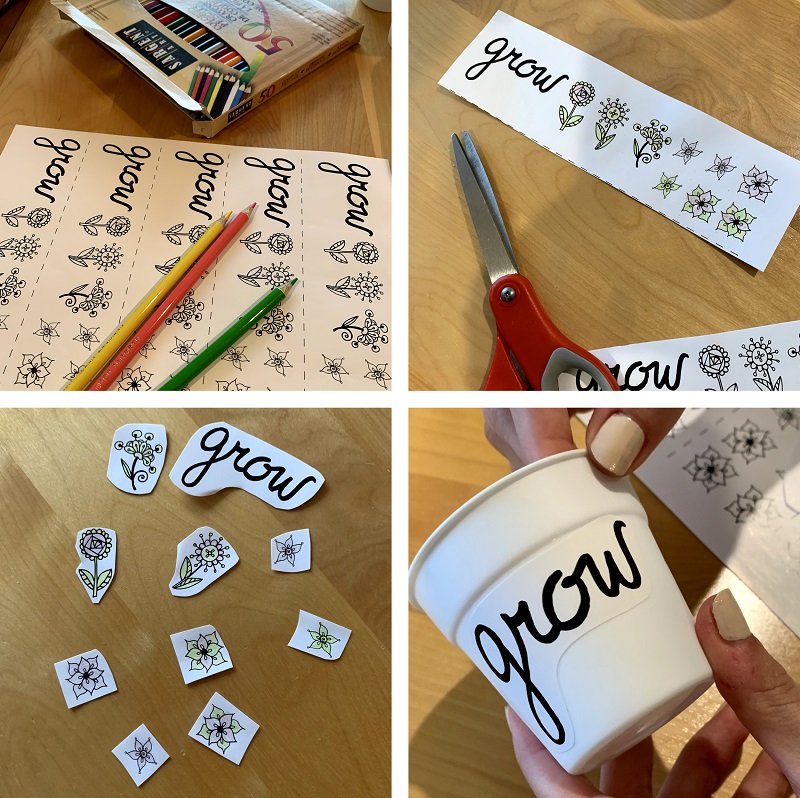
1) Cut sticker sheets along the dotted lines into 5 smaller sheets so each participant gets a section. If you prefer, you can cut out all the different flower shapes and words and place in center of the table so that everyone can take what they want. You can also cut shapes out of the blank sticker areas, that can be colored.
2) Use the colored pencils to color the stickers. (You can also use the colored pencils to color the flower pot)
3) Peel and stick the stickers onto the flower pot however you would like.
NOTE: Younger participants may need help peeling the stickers.
Rehydrate the Soil Pellets:
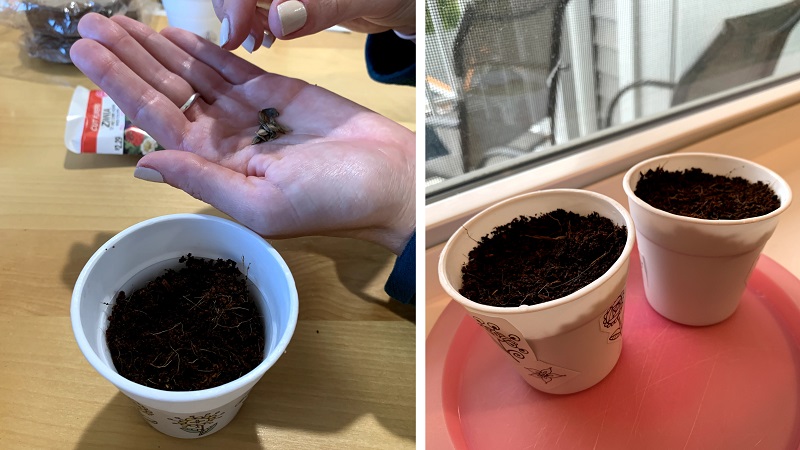
Place soil pellets in a large pan or pail. Expand the soil pellets by adding 1 cup of water for each pellet. Wait for expansion to occur. Add more water if the soil is too dry. This step can be done ahead of time or as part of the project activity – whichever is best for your group.

Planting Zinnias
Plant the Seeds:
- Fill the pots almost to the top with soil. Water soil so it is damp.
- Plant 2 to 3 seeds in each pot, following instructions on the seed packet.
- Measure and cut a piece of plastic wrap about 5″ x 5″. Place plastic wrap over the top of each pot. Secure in place with a rubber band.
- Place pots on windowsill with partial sunlight. Remove the rubber band and plastic wrap after the seeds have begun to sprout (about 5-6 days). Keep soil moist.
- When plants are 1″ tall, place pots in direct sunlight. Turn pots a little each day so the flowers receive equal sunlight. Keep the soil slightly damp at all times.
- When the plants are about 5″ tall, and the weather is appropriate outside, the plants can be transplanted into a garden or larger outdoor pot.
How to Transplant
Zinnias can be transplanted into a garden or larger pot but you need to be careful!
Here are some tips:
- Several days before transplanting, set the flower pot outdoors in part shade that is protected from winds for a few hours each day, gradually increasing their exposure to full sun and windy conditions.
- Keep the soil moist at all times.
- If possible, transplant on overcast days or in the early morning.
- Dig the new hole slightly wider than the current flower pot.
- Carefully hold the plants close to the soil and pull them gently out of the pot, with as much of the soil with them. Don’t shake off the soil! You want as much soil from the flower pot as possible.
- Set transplants into the new hole, carefully move soil around so plants are set. Water till soil is moist.
More About Zinnias
Recommended for Beginners:
Zinnias are recommended for beginning gardeners and are annuals, meaning that they go from seed to flower to seed quickly. Zinnias come in a range of every bright and pastel (except the blues), plus bi-colors, tri-colors, and crazy-quilt mixes designed for cutting, to attract pollinators, etc.
Expand your vocabulary… with Zinnias
Wonderful language gets used when describing zinnia flowers: stars and daisies, dahlias and spiders, buttons and domes, and quill-leaf cactus. Flowers can be “singles,” with petals lined up in a row around an open center, or semi-doubles, or doubles. All work marvelously in floral arrangements.
Save the seeds and plant them next year
It’s easy to save zinnia seeds. Simply let the flowers dry fully on the stem, then collect the seedheads and lightly crush them in your hand to release next year’s seed crop. Store in a cool, dry place.
Zinnias are Butterfly Magnets!
The bigger-flowered varieties act like landing pads for nectar-seeking butterflies. (Same goes for hummingbirds.) Try tall zinnias with red or hot pink flowers to get the biggest draw.

Care for your Zinnia Plants
To have bushier-shaped zinnia plants, pinch off an inch or so from the tips of the main stems while plants are still young.
Zinnias don’t like being transplanted so carefully sow seeds in pots that can be directly transplanted into the garden. Place zinnia seeds on soil surface and lightly press into the surface. Cover with 1/4″ of soil. Lightly water and cover with clear plastic or glass to keep seeds from drying out. Seeds should germinate in 4 to 7 days. Once up, remove cover and keep soil evenly moist.


