%20Text%20(Violet).png)
In 2022, I wrote one of my most popular blog posts. It was:
How I teach Levers - My delivery, my planning and my thinking
Please take a read of that post because it is packed with useful ideas and free-to-download resources. In many ways, it is a one stop shop for getting you off the ground with teaching levers. But, after the AQA GCSE PE Paper 1 exam occurred on May 17, 2023 there were a number of concerns raised about how students had performed on a levers question. I’m part of a Heads of PE WhatsApp group and numerous colleagues told me the question was unfair. After viewing the question, I didn’t agree but came to the conclusion that the issue might be that there is a tendency to teach levers mechanically (pardon the pun) and that students were memorising classifications rather than intuitively understanding them. Therefore, I am writing this post to support PE teachers truly understanding what levers are and how they operate so that we can all guide PE students to truly understand levers.
Before you read on, I need to ask a favour: please try to forget – just for a while – that you are an AQA teacher or OCR teacher or that you teach GCSE or A-level or BTEC. Rather, read this post with the intention of truly understanding levers, at which point you can apply your intuition to your qualification. This is my intent in writing.
So, let’s get started. I initially want to make a series of statements of facts that will frame the learning to come on levers.
Fact 1: All (skeletal) human movement is rotational
Apart from human movements like a churning stomach muscle or the contraction of the heart muscle, all human movement is achieved by making circles or part circles. Don’t believe me? Here’s my challenge to you: with a fellow PE teacher, perhaps, try to demonstrate a movement at any joint in your body without making a circle or part-circle. Whether your finger joints, your neck, your knee or your hips, I guarantee you that you can’t do it. Why? Because fact 1 is true.
So, we move by making circles (rotations) at joints. Good!
Fact 2: Human (skeletal) muscle can only pull
This one is important. Skeletal muscle can only apply force in the pulling direction. Your muscles cannot push. Ever! I have entire video playlists on muscle contractions and sliding filament theory and specifically why muscles can only pull but, for the purposes of this post, I simply ask you to trust me on this one.
This poses a problem: muscles can only pull but skeletal movement (which we already know is rotational) can occur in two directions. Those two directions are clockwise and anticlockwise. Therefore:
Fact 3: Muscles work in pairs in order to be able to cause and allow clockwise and anticlockwise rotation.
This is why knowledge of muscle pairs matters. In order for a person to move an arm or a leg or the head or the trunk in more than one direction, it is critical for students to grasp.
Let’s put this together. Regardless of lever classification, let’s look at how joints actually operate in general. In fact, I am going to choose a joint that most people don’t teach in order to eliminate any consideration of classification.
Take a look at this fantastic image of a triple jumper in flight:

I am going to identify the right hip as the joint we are interested in. The right hip is flexed and, as the photo is taken, the right leg is being held in a stationary position (isotonic contraction).
Therefore, we now have this:
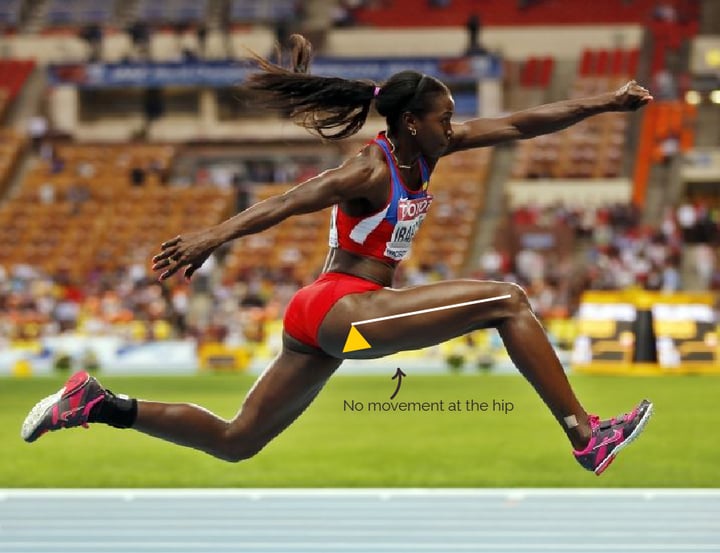
The right hip joint is the fulcrum and the right femur is the lever arm (rigid bar). Remember at this point that all long bones in the body whether really long like the femur or much shorter (but still a long bone) like a metacarpal or phalanx are long bones and long bones for lever arms.
Let’s take this further and add in the weight force of the leg:

The mass of the leg is 15kg meaning that the weight force (the load) acting downwards is 150N (FYI: Force = Mass x Acceleration and, in this case, acceleration is a result of gravity, which we are rounding to 10m/s/s).
But this is not the entire turning potential of the hip in the clockwise direction. In order to measure this, we need to measure the distance between the fulcrum and the weight. So, let’s do that:

Great! We now know that the weight of the leg is acting in the clockwise direction and that it is doing so at a force of 150N which is 50cm from the fulcrum. Therefore, we can calculate the clockwise turning potential (also known as a “torque” or a “moment”):
| Clockwise torque (Nm) | = | Clockwise force (N) | × | Distance from the fulcrum (m) |
| Clockwise torque (Nm) | = | 150N | × | 0.5m |
| Clockwise torque (Nm) | = | 75Nm |
We now know that torque acting in the clockwise direction is 75Nm. If that was the end of the story, this hip would simply rotate clockwise and fall to the floor through hip extension. However, it doesn’t. It stays in the flexed position. How does that occur?
If you’ve made it this far, you’re probably screaming at your screen “the hip flexors contract!” This is true but it is only part of the story. Let’s take a look:

Before we do some calculations, I have a few questions for you:
- Which muscle(s) is applying force F?
- Using your awareness of “For 1, 2, 3, think F, L, E”, what classification of lever is occurring in this example of hip flexion?
Answers:
- The hip flexors/Iliopsoas/Iliacus/Psoas
- 3rd-class lever back the effort is between the fulcrum and the load.
And now let’s do some calculations. I am going to provide you with the relevant equation and then ask you to complete three calculations:
| In order for the hip to remain stationary | : | Clockwise torque = Anticlockwise torque |
| In order for the hip to rotate clockwise (extension) | : | Clockwise torque > Anticlockwise torque |
| In order for the hip to rotate anticlockwise (flexion) | : | Clockwise torque < Anticlockwise torque |
And now to the calculations. I would like you to consider providing three answers:
Given the information provided, all three calculations are possible but, more importantly, thinking about levers in this way allows us, as teachers, to truly understand what is occurring.
I would like to clarify a point: what is contained above is not what I would teach to students directly. The material contained is for teachers to truly grasp the heart of the lever concept in order to equip you to teach effectively.
For more information on GCSE and A-level PE classroom teaching of levers, please visit here, where you also find numerous free downloads specifically relating to the teaching of levers at GCSE and A-level (or equivalent).
Have a good day.